

Table of Contents
- How to Identify a Tick on Your Pet
- Tick Removal Tools for Pets You'll Need
- Step-by-Step Process to Remove Ticks from Pets
- What to Do After Removing Ticks from Pets
- Signs of Tick-Borne Diseases in Pets to Watch For
- Common Mistakes to Avoid When Removing Ticks
- Best Tick Repellent for Dogs and Prevention
- When to See a Veterinarian
Last Updated: August 17, 2026
How to Identify a Tick on Your Pet
Unfed ticks are small, flat, and dark brown or reddish, ranging from pinhead to sesame seed size. As they feed, they swell to roughly pea-size and shift toward gray or tan. When inspecting your pet, look for small bumps attached to the skin. Run your hands through your dog's coat, paying close attention to warm, moist areas where ticks prefer to attach: behind the ears, between the toes, in skin folds, around the neck, and along the belly. Once attached, ticks burrow their mouthparts into the skin and begin feeding.
A tick will feel slightly raised with visible legs around the attachment point. If uncertain, part the fur and look closely. A true tick has a distinct body with eight legs (they're arachnids, related to spiders). This distinguishes ticks from skin tags or moles.
Tick Removal Tools for Pets You'll Need
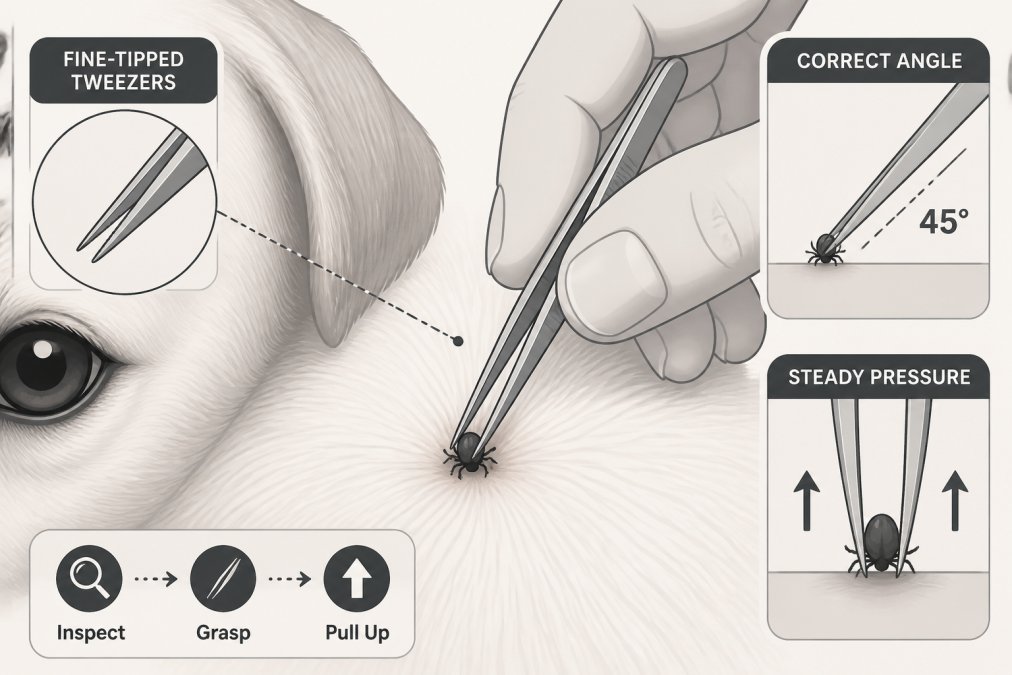
The most effective tool for tick removal is a fine-tipped tweezers or a specialized tick hook designed for this task. Fine-tipped tweezers allow you to grasp the tick's body close to where it attaches to the skin. A tick hook is a small, handheld device with a notched end that slides under the tick's body, particularly useful if you have multiple pets or live in a high-tick area.
Gather these supplies before you begin:
- Clean cloth or paper towel
- Rubbing alcohol or antiseptic solution
- Gloves (optional but recommended)
- Small container with a lid for tick disposal
- Cotton swab or small applicator for disinfecting the bite site
Avoid improvised methods like fingernails, bobby pins, or blunt tweezers, these don't provide the precision needed and increase the risk of crushing the tick. Old folklore remedies like petroleum jelly, heat, or essential oils are unreliable and may agitate the tick, causing it to burrow deeper or regurgitate its contents into the bite site.
Step-by-Step Process to Remove Ticks from Pets
Prepare Your Pet and Workspace
Start by creating a calm environment with your pet sitting or lying down in a well-lit area. Have a second person gently hold or comfort your dog if needed. Gather all tools within arm's reach: tweezers or tick hook, alcohol, gloves, cloth, and a container for disposal. If your pet has thick fur around the tick, trim a small area with clippers to see the attachment point clearly.
Wear gloves if you prefer to minimize direct contact with the tick. Wash your hands thoroughly after the removal process regardless.
Grasp and Extract the Tick
Position your tweezers or tick hook as close to the tick's mouthparts as possible, right where the head enters the skin. A firm but gentle grasp is essential, you're not trying to squeeze the tick, but creating a secure hold for steady pressure.
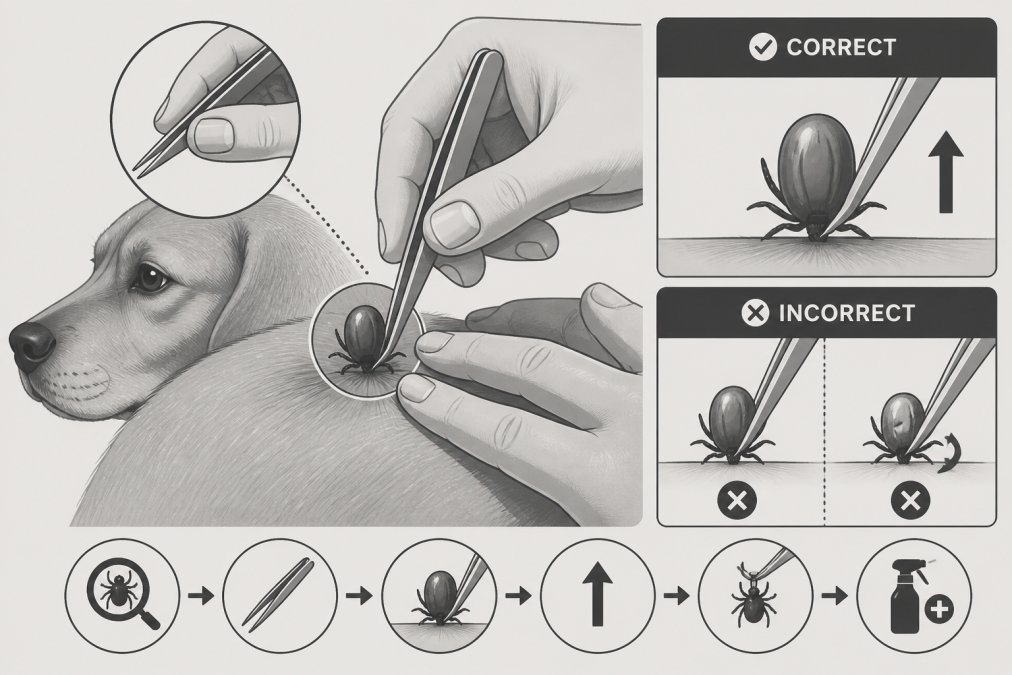
Pull straight upward with slow, deliberate pressure. Maintain steady tension for 10 to 20 seconds. Avoid twisting, jerking, or yanking motions, as these break the tick's body and leave mouthparts behind. If the tick doesn't release after 20 seconds, pause, reposition your grip slightly closer to the skin, and try again.
Once the tick releases, place it immediately into your container with alcohol or a sealed bag. Do not crush it with your fingers.
Disinfect the Bite Site
After the tick is removed, clean the bite area thoroughly with rubbing alcohol, hydrogen peroxide, or an antiseptic solution applied with a cotton swab. Gently clean for 10 to 15 seconds, then allow it to air dry. Some pet owners prefer pet-safe alternatives like diluted chlorhexidine or povidone-iodine solutions. Avoid human-grade antibiotic ointments unless your veterinarian recommends them.
If you notice redness, swelling, or discharge at the bite site over the following days, contact your veterinarian.
What to Do After Removing Ticks from Pets
Proper Tick Disposal
Place the tick in a container filled with rubbing alcohol, which kills it within minutes. Once dead, seal the container and dispose of it in regular trash. An alternative is to place the tick in a sealed plastic bag or container and freeze it. Some veterinarians recommend keeping the tick in a sealed container in case your pet develops symptoms of tick-borne illness later, the preserved tick can be identified to help diagnose the disease.
Never attempt to burn a tick or crush it with your bare hands.
Post-Removal Monitoring Timeline
Watch for signs of infection at the bite site during the first 24 hours: increased redness, warmth, discharge, or swelling. Over the next two to three weeks, monitor your pet for early signs of tick-borne illness, as these diseases have incubation periods ranging from days to weeks. Keep a log of your pet's behavior, appetite, and energy levels.
Signs of Tick-Borne Diseases in Pets to Watch For
Lyme disease, transmitted by blacklegged ticks, causes lethargy, reduced appetite, fever, and joint swelling or limping. Rocky Mountain spotted fever causes fever, lethargy, and sometimes a rash on the abdomen or legs. Anaplasmosis presents similarly, with fever, lethargy, and sometimes vomiting or diarrhea.
Not every tick carries disease, and not every tick bite results in infection. However, the longer a tick remains attached, the greater the risk of pathogen transmission. If your pet develops any combination of fever, lethargy, loss of appetite, joint swelling, or unusual behavior within three weeks of a tick bite, seek veterinary care immediately.
Common Mistakes to Avoid When Removing Ticks from Pets
Applying substances like petroleum jelly, essential oils, or heat before removal often causes the tick to burrow deeper or regurgitate its stomach contents into the bite wound, increasing pathogen transmission risk.
Twisting or jerking the tick during removal breaks its body, leaving mouthparts embedded in the skin. Crushing the tick with your fingers releases infectious material and exposes you to potential pathogens. Always use a tool that allows controlled extraction.
Waiting too long before removing ticks is a strategic mistake. The longer a tick feeds, the greater the risk of disease transmission. Daily tick checks during high-risk seasons catch parasites early when removal is easiest and safest.
Many pet owners neglect to monitor their pets after removal, missing early signs of illness. A consistent monitoring routine for two to three weeks after removal catches developing infections when they're most treatable.
Best Tick Repellent for Dogs and Prevention
The most effective approach to tick removal is preventing ticks from attaching in the first place. Topical tick repellents applied to the skin or coat create a protective barrier. Sprays containing permethrin or other active ingredients repel ticks and other parasites, though reapplication is required based on the product's duration.
Tick patches or wearable devices offer a hands-free alternative for extended outdoor trips. Oral tick prevention medications, prescribed by veterinarians, provide systemic protection by killing ticks when they attempt to feed. Many are highly effective and convenient, requiring only monthly or quarterly dosing.
Yard treatments reduce the tick population in your environment by treating your lawn, garden, and outdoor spaces where your pet spends time. The best tick repellent depends on your lifestyle, your pet's sensitivity, and your local tick pressure. A combination approach often provides the most reliable protection.
When to See a Veterinarian
Seek veterinary care if you're uncertain whether you've successfully removed the entire tick. Your veterinarian can examine the site and remove any remaining fragments. Contact your veterinarian if the bite site shows signs of infection: increasing redness, swelling, discharge, or a foul odor.
If your pet develops any signs of tick-borne illness within three weeks of a tick bite, fever, lethargy, loss of appetite, joint swelling, or behavioral changes, schedule a veterinary appointment promptly. Blood tests can identify specific tick-borne pathogens, and early treatment significantly improves outcomes.
For pet owners in areas with high Lyme disease prevalence or other serious tick-borne illnesses, regular veterinary check-ups during tick season provide an opportunity to discuss prevention strategies and monitor for early signs of disease.
Removing ticks from pets promptly and correctly protects your dog's health and prevents the spread of tick-borne illness. The tools are simple, the technique is straightforward, and the stakes are high. At TickFree Outdoors, we understand that tick prevention starts with knowledge and proper execution. Whether you're using a fine-tipped tweezers or a specialized tick hook, the key is steady pressure, proper disposal, and vigilant post-removal monitoring. For pets that spend significant time outdoors, combine manual removal skills with reliable tick prevention, sprays, patches, or veterinary-prescribed medications that reduce the likelihood of ticks attaching in the first place. TickFree Outdoors offers comprehensive tick protection solutions designed to keep your pets safe during outdoor adventures. With proper technique, consistent monitoring, and preventative measures, you can keep your dog tick-free and healthy year-round. Shop all tick prevention products and get started protecting your pet today.
Frequently Asked Questions
What is the safest way to remove a tick from a dog or cat?
Use fine-tipped tweezers or a tick removal tool to grasp the tick as close to the skin as possible. Apply steady, even pressure and pull straight out without twisting or squeezing the body. This prevents the mouthparts from breaking off and reduces the risk of pathogen transmission. Disinfect the bite site with alcohol or antiseptic afterward. Avoid home remedies like petroleum jelly or heat, which can cause the tick to release pathogens into your pet.
Can rubbing alcohol kill ticks on dogs?
Rubbing alcohol can kill ticks and is useful for disinfecting the bite site after removal, but it should not be your primary removal method. Alcohol applied to an embedded tick may cause it to release pathogens before you extract it. After you've safely removed the tick with tweezers, apply alcohol to the wound to disinfect it. Store the removed tick in alcohol if you need to preserve it for testing.
How do I know if I removed the entire tick?
Check that you've removed the head, body, and all legs. The tick should come out intact when you apply steady pressure and pull straight out. If you see broken mouthparts left in the skin, use clean tweezers to remove them gently. A small red bump may remain briefly, but if you notice swelling, redness, or discharge that worsens after a few days, contact your veterinarian to rule out infection or incomplete removal.
Should I see a veterinarian after removing a tick from my pet?
A routine tick removal doesn't require a vet visit, but monitor your pet for symptoms of tick-borne diseases over the next 2-4 weeks, including lethargy, loss of appetite, fever, or swelling of joints. If you couldn't remove the entire tick, the mouthparts broke off, or your pet shows any signs of illness, contact your veterinarian. In areas where Lyme disease is common, discuss preventative parasiticide treatments with your vet.
This article was written using GrandRanker